

Welcome to part 2 of the Layers series!
The first tutorial was an introduction to layers. Today, we will be taking a closer look at the Layers Panel.
The Layers Panel is the headquarters of all things layers-related and it is the most frequently-used panel in Adobe Photoshop. The Layers Panel houses all the layers, layer groups, and layer effects of your document.
By default, the Layers Panel should automatically be displayed and located at the lower right of your screen every time Photoshop is launched. If it is not, go to Window > Layers or press F7 to open up the panel.
First of all, open up an image in Photoshop. Pictured here is a flattened pdf of our Tranquility art print. Right off the bat, you will be able to notice that your image is added to the Layers Panel, and it is called “Background“.

Upon closer observation, you will also be able to see that the Layers Panel is separated into six sections. Here is an overview of what you can do in the Layers Panel.

As mentioned in the previous tutorial, the order of the layers in the layers stack reflects the similar order in your work. The top layer in the panel is the top layer of your work, and so it goes on in descending order.
Let’s start our tour with the strip of seven buttons at the bottom.

From right to left, the buttons are: delete layer; new layer; new group; new fill or adjustment layer; add layer mask; layer styles; and link layers. I will not be going through each portion of the Layers Panel in detail as they are easily full topics individually. Today is all about understanding the panel and what it can do.
Button 1: Delete Layer
As the name says, it removes the chosen layer. Very simple and to the point!
Button 2: New Layer
This button creates new layers. Go on, click on it.

Your new layer will appear in the layers stack and sit directly above your Background layer. It will also be named “Layer 1” by default. As mentioned in the previous tutorial, the preview thumbnails reflects exactly what each layer contains. Our current Layer 1 is empty, hence the checkerboard pattern which represents transparency.
I have circled an icon of an eye in the image above. This is the layer visibility icon that controls what you want to see in your work and what you wish to be hidden. When the eye is visible, it means that the layer is visible in your document. If you click on the icon, the eye will disappear and that signifies that the layer is now hidden. It is still in your document, but it is just not visible.
You can also duplicate any existing layers using this New Layer button. Select your Background layer, press and hold your mouse button, then drag it down onto the New Layer button. Release your mouse button. You will notice that a copy of your Background layer has appeared in the layers stack and is named “Background copy”. Nifty!

You can easily rename your layers by double clicking on the layer’s name in the panel and when you’re done, just press Return for Mac users and Enter for Windows.
Button 3: New Group
When you are working on a project that involves many different layers, it is best to group them together in a folder. This will help you to easily locate, select, and manipulate the entire group of layers together as a single unit.

If you click the icon, an empty folder will appear in the panel. You will then need to drag your selected layers into the folder to group them. You can click the arrow next to the folder icon to open or close the group. If you wish to view the layers you have in the folder, just click the arrow! To remove a particular layer from the folder, select the layer, press, hold and drag the layer out of the folder.
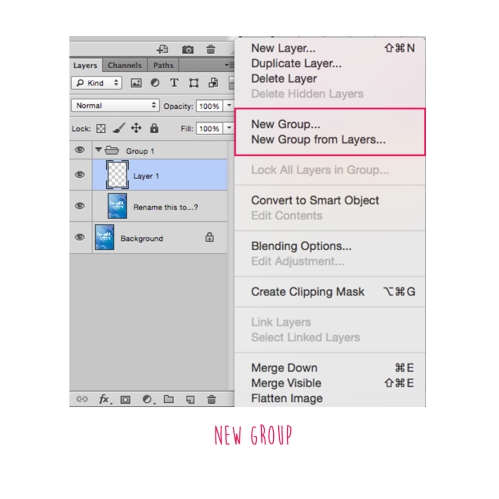
Another way of grouping your layers is via the menu icon at the top right corner of the Layers Panel. Select your layers (hold down the Shift key to select your layers) and access the menu icon. From the dropdown menu, choose New Group from Layers.
Button 4: New Fill or Adjustment Layer
Fill layers essentially fill your selected layer with either a solid colour, a gradient, or a pattern.
Adjustment layers help to apply image adjustments such as Levels, Hue/Saturation, and Photo Filter to the layers under them. These are stable, maskable, and non-destructive layers. To add one of these layers, just click the button and from the pop-up list, select your adjustment technique.
Button 5: Add Layer Mask
To add a layer mask on your layer, select your layer and then click the button. Layer masks will enable you to control the transparency of every single pixel within a layer. The layer mask will appear in the layers stack. I will go through layer masks in another tutorial as it is seriously a full topic on its own.
Button 6: Layer Styles

Another non-destructive effect that you can add to your selected layer. With this button, you can add shadows, glow, strokes, and a lot more effects to your layers. These can be adjusted with a live preview so that you know exactly what you are doing at each moment. The layer styles will be reflected in the layer stack. There will also be a tutorial on this in future!
Button 7: Link Layers
I use this so often. Linking layers allows you to move multiple layers together without the need to select the required layers every single time.

To link your layers, press the shift key and select the layers. Next, just click the button and your layers are now linked! The link symbol at the right hand side of your layers shows that your layers are linked. They can be easily unlinked by selecting the layers and clicking the button again.
Above the layer stacks, there is a section dedicated to locking layers. There are four different ways to lock your layers and each are represented by a button. The four ways are (from right to left) lock all; lock position; lock image pixels; and lock transparent pixels.

Lock all essentially locks everything in your layer. You will not be able to do anything to it; you can’t even delete it! You can however, shift its position in the layers stack. That’s all though.
Lock position ensures that we don’t accidentally move or resize our layer. You can play with the layer’s appearance with tools such as erase, blur, burn, sharpen etc.
Lock image pixels is the opposite of lock position.
Lock transparent pixels enables you to only manipulate non-transparent pixels. The transparent parts of your layer will be completely safe!
Now, let us move on to the next section that includes the controls for blending layers together, as well as the opacity and fill sliders.

Layer blending can get really confusing and is another topic that requires a tutorial by itself.
The opacity slider controls a layer’s level of transparency. 100% transparency means that the layer is completely opaque. The lower the slider and the percentage, the lower the opacity value drops and the more transparent the layer gets.

In this example, I have added a black circle to the art print and adjusted the opacity of it. You can see the difference between 100% transparency and 50% transparency by looking at the circle. At 50% transparency, you can see the original art print peeking through the circle.
The fill option also controls the layer’s transparency value. You may think that they do the same thing but the effects are different, especially when layer styles are tossed in the mix. I will delve deeper into the differences in another tutorial.
Above the layer blend option is the search section which is a huge lifesaver. Layer searching helps you manage your multiple layers effectively.

Searching by Kind is the default method. There is a row of icons that signifies the various types of layers: pixel layers, adjustment layers, type layers, shape layers, and smart objects. Click on the icon to filter your search.
Click on the dropdown menu to alter your search function. You can search via effect, mode, attribute, colour, or by name. Once you are done, click the little switch at the top right corner of this section.
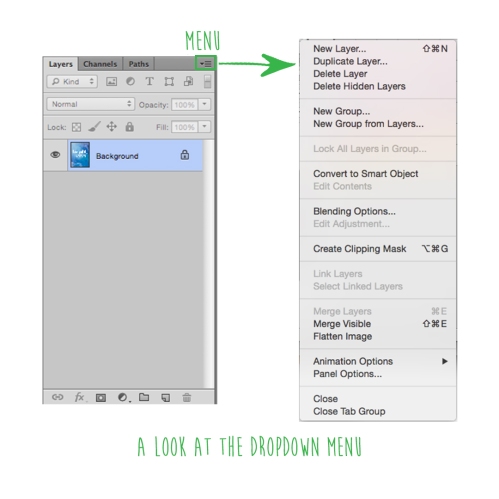
Finally, there are more options in the pop-up menu at the corner where we clicked previously. The options are relatively straightforward. For example, choosing Merge Visible means to combine all your visible layers (the layers with the eye icons) into one layer, while Flatten Image combines every single layer into one flat layer.

If you want to adjust the look of your Layers Panel, select Panel Options. A dialog box will pop up where you can change the size of your preview thumbnails or get rid of them totally (not recommended), and what you can see in the thumbnail. If you have layers with really small elements, selecting “Layer Bounds” under Thumbnail Contents would enable you to see the tiny elements clearly in the previews.
If you get irritated with the default “copy” word for all your layer copies, turn off the option for “Add copy to Copied Layers and Groups“. It doesn’t really bother me as I rename my layers dutifully immediately.
–
Alright, that is it for our quick little tour around the Layers Panel. The next tutorial will focus on the Background layer.
Let me know if there is anything I missed out or went by too quickly in the Layers Panel that you would like to know about!
❤ Jia

2 thoughts on “Photoshop Basics Tutorial // Touring the Layers Panel”